Continue interrupted Visual Studio 2015 Update 2 installation

If you were installing the new Visual Studio 2015 Update 2 and the setup interrupted by bad Internet connection or some other reason; you can continue the process by running the update again but from the command line with the option of /repair like this:

vs2015.2.exe /repair

Then the repair starts:

vs2015 update 2

vs2015 update 2

To get to the command line quickly and make it point to the correct location of your file you can use SHIFT + Right Click then choose Open Command window here:

Open Command Here

Open Command Here

I like Windows 10 shortcuts 🙂

Share

Application Insights problem with a team project

A few days ago I started testing the process of developing Windows 10 universal application and I wanted to test integrating some of Microsoft Azure in my app.

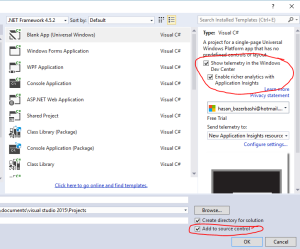
I created a new repository in Visual Studio Online (I love it ❤) and went back to Visual Studio 2015 to create my project. While creating a new project you can connect to the source control right away and you can configure Application Insights for your project automatically.

Application Insights

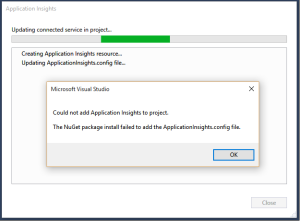
After hitting the OK button the project started connecting to the source and then trying to configure the Application Insights when I got the error message: Could not add Application insights to project. The NuGet package install failed to add the Applicationinsights.config file.

Insights errorMaybe this is a bug since this whole thing is still in Preview and I will try to get in touch with the team behind this.

The simple fix was to check out the whole project, add the resource manually, update the NuGet packages of the project to the latest version and then right-click on your project -> Configure Application Insights.

I will make a post later about the experience of making a Universal Windows 10 app, Integrating with Microsoft Azure and submitting to the Store 🙂


Share

Crystal Reports works on Windows 10

Hey guys 🙂 this is a quick post to let you know that Crystal Reports is working normally on Windows 10 and I didn’t have any problems.

Windows 10 Crystal Reports

The Crystal Reports version I’m using is 13, so if you were holding up and afraid to upgrade don’t worry and go ahead 🙂


Share

Set DateTimePicker control value to Null

I achieve this by handling the Binding Source that the control is binding to and enabling the ShowCheckBox property.

The .NET DateTimePicker doesn’t accept blank or NULL value. I’ve seen many posts online that extend the controller to accept NULL value like this one or some other posts to change the formatting to custom and switching back again.

So if you don’t feel like adding a new custom control to your project just handle the underlying data source.

DateTimePicker with CheckBoxesSince I had many of the DateTimePicker controls, I made one function that handles the Leave event of each one like so:

    Private Sub DateTimePicker_Leave(sender As System.Object, e As System.EventArgs) Handles Inv_OriginalDateTimePicker.Leave
        'Handle the DateTimePicker so when it is unchecked it saves Null value
        Dim dt As DateTimePicker = sender

        If Not dt.Checked Then
            'Get the current record
            Dim row = DirectCast(Me.PO_JobsBindingSource.Current, DataRowView)

            row(dt.DataBindings.Item("Value").BindingMemberInfo.BindingField.ToString) = DBNull.Value

        End If
    End Sub
Share

Moving items between bound Listboxes

The other day I wanted to add news tags feature to a program, and to make it easy I wanted the user to be able of adding and removing news tags by double clicking a Listbox of available tags and assigned tags.

How I wanted Listboxes Tags to work

If you need to move items between bound Listboxes you cannot just use the Listbox.Add or Listbox.Remove methods. Instead you should add and remove rows to the Tables which they’re bound to.

This is the code I used:

    Private Sub AvailableTagListBox_DoubleClick(sender As System.Object, e As System.EventArgs) Handles AvailableTagListBox.DoubleClick
        If Not IsNothing(AvailableTagListBox.SelectedItem) Then
            'We are making a new row to be added to the table which then will appear in the listbox
            Dim Customer_News_Tags_Row As DataRow = MyDataSet.Customer_News_Tags.NewRow
            'Since I have a Parent and Child relation I'm taking the current parent ID
            Dim NewsRow = DirectCast(Me.Customer_NewsBindingSource.Current, DataRowView)
            'Parent ID
            Customer_News_Tags_Row("News_ID") = NewsRow("ID")
            'Fill the listbox item display field which I have it bound to
            Customer_News_Tags_Row("Tag") = AvailableTagListBox.Text

            'Adding new item to the other listbox by adding new row to its table
            MyDataSet.Customer_News_Tags.AddCustomer_News_TagsRow(Customer_News_Tags_Row)
            'Delete the listbox item by deleting the row in its table
            MyDataSet.News_Tags.Select("ID=" & AvailableTagListBox.SelectedValue)(0).Delete()

        End If

    End Sub

    Private Sub AssignedTagListBox_DoubleClick(sender As System.Object, e As System.EventArgs) Handles AssignedTagListBox.DoubleClick
        If Not IsNothing(AssignedTagListBox.SelectedItem) Then

            Dim News_Tags_Row As DataRow = MyDataSet.News_Tags.NewRow
            'I'm using a field called Tag
            News_Tags_Row("Tag") = AssignedTagListBox.Text

            MyDataSet.News_Tags.AddNews_TagsRow(News_Tags_Row)
            'Here I'm matching with a field I have called Tag to delete from Assigned listbox items
            MyDataSet.Customer_News_Tags.Select("Tag='" & AssignedTagListBox.SelectedValue & "'")(0).Delete()

        End If
    End Sub

Hope this helps, and if you need any clarifications let me know 🙂

Share

Move project to another Visual Studio Online account

Let’s say you have a project source hosted in your private Visual Studio Online (Team Foundation Service) account and you want to move it to another account. The easiest way I found is to connect to the new account from Visual Studio (File->Connect to Team Project) and add the items to the source control:

TFS Add Items

Assuming you already have the source on your computer, just select them to be added. Also It will ask you to map a new work space for this new source:

TFS Map WorkSpace

Hit finish and then you are ready to check in the files.

I’ve been using Visual Studio Online for few months now since it was in beta when it was called Team Foundation Service and I totally love it!

The service gives you the ability to collaborate for free for up to 5 members and then you need to license users. I used it to collaborate with a friend and it gave us great help and it was very easy to use. Even though it is great for collaboration but I think you can use it also on your own for good maintenance.

Share